Orpaillage
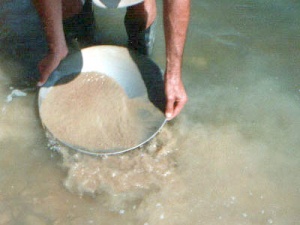
La page « orpaillage » de l’ancien site ilotresor affichait les photos prises lors d’un stage d’orpaillage effectué en 1995 sur les bords du Rhin et du Doubs. Ces photos n’étant pas de bonne qualité, je ne recrée donc pas la même page. Mais vous trouverez désormais ici des infos sur l’orpaillage : matériel utilisé, techniques, réglementation, histoire de la ruée vers l’or… Des liens vers YouTube vous permettront de découvrir des vidéos parfois étonnantes sur ce thème.
Sites web et vidéos sur l’orpaillage
- Goldline Orpaillage : site d’une association française (loi de 1901) pour découvrir les techniques d’orpaillage et la réglementation. Etre chercheur d’or en France. Quel matériel utiliser pour la prospection ?
- Fédération Française d’Orpaillage (FFOR). La FFOR regroupe deux associations d’orpaillage et environ 80 membres individuels promouvant la pratique d’un orpaillage de loisir depuis 1987. Compte Facebook de la FFOR.
- World Golpanning Association
- Orpaillage illégal en Guyane (site du WWF)
- Vidéos sur l’orpaillage en France
- Vidéos sur l’orpaillage en Allemagne (Goldwaschen in Deutschland)
- Vidéos sur l’orpaillage aux Etats-unis (gold panning in USA) et en Californie
- Comment trouver un placer ? (tutoriels YouTube)
- Championnats mondiaux d’orpaillage (pépites à trouver dans un bac de sable)
- Cours de l’or (lingots, lingotins, Napoléons…).
- Comment récupérer l’or des composants électroniques
Articles de presse sur les orpailleurs
- Son hobby : chercheur d’or dans les rivières en Wallonie (TVCOM, septembre 2018)
- Bref, j’ai passé une matinée à chercher de l’or (L’homme en bleu, juillet 2017)
- La France, une mine pour les chercheurs d’or (VSD, mars 2017)
- Richesses géologiques en Limousin : l’or coule encore à flots (France Bleu, juillet 2016)
- Passion : chercheur d’or en Haute-Savoie (France Bleu, août 2014)
- En quête de paillettes les pieds dans l’eau (Coopération, juin 2014)
- Ruée vers l’or en Dordogne : Au milieu, brille une paillette (Sud-Ouest, août 2010)
- Orpailleurs en herbe (archive vidéo de 1966 de la RTS)
Documentation sur l’orpaillage
- Livres en français sur l’orpaillage (Amazon)
- Livres en anglais sur l’orpaillage (Amazon)
Recherches géolocalisées selon Google Trends avec « gold panning »
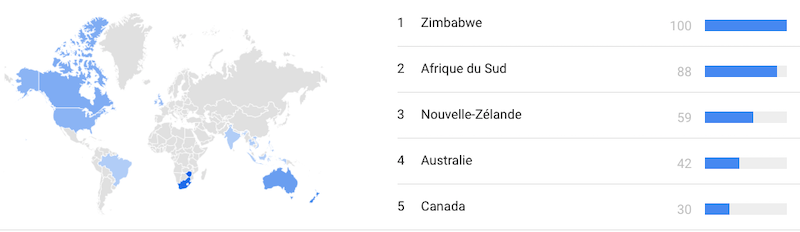
Vidéo YouTube sur l’orpaillage dans ces pays :
- Gold panning in Zimbabwe (orpaillage illégal dans le parc de Chimanimani).
- Gold panning in South Africa (stages d’orpaillage pour les touristes, prospection au détecteur, championnats, mais parfois aussi orpaillage illégal).
- Gold panning in New Zealand (orpaillage et prospection au détecteur de métaux).
- Gold panning in Australia (grosses pépites comme en 1869, une pépite d’or de 72 kg nommée Welcome Stranger découverte à 3 cm de la surface du sol ! Ruées vers l’or en Australie à partir de 1851).
- Gold panning in Canada (avec la fameuse ruée vers l’or du Klondike entre 1896 et 1899).
Et si vous voulez récolter de l’or sans sortir de chez vous, vous pouvez vous lancer dans la célèbre chasse au trésor Sur la trace de la Chouette d’Or. Mais attention, la chasse a été reprise en main par Michel Becker en 2021, qui a enterré la chouette 2/8 à l’emplacement indiqué par les solutions trouvées sur une disquette. Cette chouette 2/8 a été trouvée aux bornes Saint-Martin à Dabo le 3 octobre 2024. La chouette 1/8 n’a toujours pas été découverte.
